 How to Strike Like Fire in Dota 2
If you want to be the fire — the kind that appears from nowhere, burns everything, and disappears before anyone can touch it — Ember Spirit is the hero you’re looking for.
![]()
This blog is a love letter to Ember Spirit, written after years of joy, frustration, adrenaline, and clutch moments playing this hero in Dota 2. Before we go deep into mechanics and decisions, let’s start with why Ember feels different.
 Why Ember Spirit Is Special (and Why I Keep Coming Back)
Ember Spirit isn’t just a hero you play — he’s a way of thinking.
- In the early game, you are a frontline general: tanky, aggressive, absorbing pressure while dealing explosive damage with high-level spells.
- In the mid game, you evolve into a tactical leader. You’re no longer unkillable, but you control fights through timing, positioning, and coordination—entering at the right moment to finish what your team starts.
- In the late game, you become a strategic operator. Your value shifts away from raw damage toward backline pressure, vision, disruption, and enabling your team to win fights that would otherwise be impossible.
Ember’s role is always changing. If you don’t adapt with it, even a game full of kills can still slip away.
What truly sets Ember Spirit apart is that player skill matters more than almost any other hero.
- One second of hesitation.
- One misplaced remnant.
- One greedy Sleight.
That single decision can decide:
- your life or death
- the outcome of a teamfight
- sometimes, the entire game
Ember rewards instinct, map awareness, and tempo. When played well, he feels untouchable—everywhere at once. When played poorly, he punishes you instantly.
This is also a hero that shines on the biggest stages in Dota history — from TI8 ![]() to TI10
to TI10 ![]() finals — and continues to define high-skill midlane play.
finals — and continues to define high-skill midlane play.
And somehow, after all these years:
- His spells have barely changed since Dota 6.73 (year 2011)
- His voice lines still hit hard
- His item builds can include the most Dota item of all time: Divine Rapier
 — the ultimate expression of never give up.
That’s why I keep playing Ember. And that’s why this guide exists.
 What This Blog Covers
This guide focuses on Ember Spirit as a midlaner, breaking the hero down from multiple perspectives—not just what to do, but how Ember thinks, moves, and wins games.
We’ll walk through playstyles, skill and item choices, and—most importantly—decision-making across every stage of the game, from early pressure to late-game strategy.
Each section is paired with short, focused video clips—not to flex, but to show how Ember actually functions in real matches. The examples include both favorable and difficult situations, where decisions are made quickly and mistakes are immediately punished.
Roadmap:
- Play mindset at different stages of the game (1. Early game, 2. Mid game, 3. Late game)
- Ability and item builds
- Advantageous and hard matchups
- Additional notes & context
If you love this hero too — or have your own Ember stories to share — feel free to reach out ![]() .
.
 Play mindset at different stages of the game
This section breaks down Ember Spirit’s role at each stage of the game and introduces the key principles and tricks that help you—and your team—play stronger and more decisively.
 Laning Phase (0–12 min | Hero Level 1–10): Frontline General
In the early game, think of Ember Spirit as a fearless frontline general—constantly stepping into the thick of the fight, soaking damage while dealing heavy burst in return.
Ember’s early durability comes from two sources: strong base armor, which mitigates physical damage, and Flame Guard ![]() , which absorbs a large amount of magic damage. Together, these allow Ember to play aggressively without instantly collapsing.
, which absorbs a large amount of magic damage. Together, these allow Ember to play aggressively without instantly collapsing.
With higher early levels in Searing Chains ![]() or Sleight of Fist
or Sleight of Fist ![]() , Ember becomes especially lethal against low-HP side-laners. His ultimate, Fire Remnant
, Ember becomes especially lethal against low-HP side-laners. His ultimate, Fire Remnant ![]() , then provides unmatched flexibility—enabling rapid engagement, repositioning, and clean disengages.
, then provides unmatched flexibility—enabling rapid engagement, repositioning, and clean disengages.
When executed correctly, Ember Spirit can secure multiple early kills and convert that momentum into a decisive team advantage.
Want to pull off plays like the ones in the demo? A strong early game on Ember Spirit isn’t about flashy mechanics alone—it’s built on a set of fundamentals you need to execute consistently. That means securing XP, controlling runes, understanding the early damage spikes of Sleight of Fist ![]() and Searing Chains
and Searing Chains ![]() , choosing the right moments to gank, and farming efficiently when fights aren’t available. The sections below break down these core tricks one by one.
, choosing the right moments to gank, and farming efficiently when fights aren’t available. The sections below break down these core tricks one by one.
 Secure XP and Gold First: Flame Guard
  for Wave Control
Ember Spirit is a spell-dependent hero, which makes hero levels extremely important.
Unlike strong early lane bullies such as Lina ![]() or Shadow Fiend
or Shadow Fiend ![]() , Ember is not designed to dominate mid purely through early solo kills at hero level 3–4 (though it can happen in certain matchups).
, Ember is not designed to dominate mid purely through early solo kills at hero level 3–4 (though it can happen in certain matchups).
Your top priority before hero level 6 is:
Secure XP and gold — not killing the enemy midlaner.
With this in mind:
- It is perfectly reasonable to invest early spell points into Flame Guard .
- For example, learning Flame Guard at hero levels 1 and 3 is common
- Even if you plan to max Sleight of Fist
 or Searing Chains
  later (around hero level 8)
A spell level 2–3 Flame Guard allows you to:
- Quickly clear creep waves
- Secure most last hits
- Maintain lane control without overcommitting
 High-Level Sleight of Fist or Searing Chains = Real Damage Burst
While Flame Guard is excellent for clearing lanes and jungle camps, it is not your primary source of kill pressure. Enemies won’t stand still and burn. To actually secure kills, Ember Spirit relies on high-level Sleight of Fist ![]() or Searing Chains
or Searing Chains ![]() .
.
- Sleight of Fist lets you strike from long range, dealing AoE physical damage while staying safe.
- Searing Chains roots enemies in place, allowing Ember to unload reliable magical burst.
At higher levels, both spells have high damage and low cooldowns, enabling Ember to repeatedly apply pressure during rotations and skirmishes. This burst is especially punishing against early-game side-laners, who typically have low HP and limited defensive tools. As a result, a well-timed rotation can easily convert spell damage into early kills—even without a large item advantage.
 Trade HP → Reset → Come Back Stronger (Hero Level 5–6 Spike)
As Ember Spirit approaches level 6, he unlocks one of his strongest advantages: the ability to instantly TP ![]() back to base and return to the fight using Fire Remnant
back to base and return to the fight using Fire Remnant ![]() .
.
You can convert this into an early-game advantage over the enemy mid laner by following a simple pattern:
- Trade health aggressively with the enemy mid laner before level 6.
- As soon as you hit level 6, place a Fire Remnant
 in mid; TP back to base to fully restore HP and mana.
 - Instantly return to the mid lane using Activate Fire Remnant
 to maintain pressure.
You now return with:
- Newly completed items, e.g.,

- Ultimate online
- A massive status advantage with full health and mana
This often:
- Leads to a solo kill
- Forces the enemy midlaner to walk back to base and causes them to miss waves
- Opens opportunities to rotate and gank side lanes
 Rune Control (Hero Level 6+)
When power runes (e.g., arcane ![]() , damage boost
, damage boost ![]() ) are about to spawn (e.g., game time 5:50, 7:50):
) are about to spawn (e.g., game time 5:50, 7:50):
- Pre-place a Fire Remnant near one rune location.
- Use spells to quickly clear the mid wave, or aggro the creeps to follow you, ensuring you don’t miss lane XP.
- Walk toward the opposite rune spot and bottle the rune
 if it spawns on the side you’re walking to.
 - If the rune spawns on the other side—or if you’re in danger—snap back using Activate Fire Remnant .
This setup:
- Maximizes your chance of securing the rune
- Preserves Remnant mobility – easy to escape if enemy supports gank you on the one rune spot
 Ganking Side Lanes with Power Runes
Power runes massively increase gank success in the early game, especially when rotating to side lanes. Ember Spirit’s spell damage is extremely high at this stage— when commiting fully and using all of your spells. This often secures a kill even against enemies who have more gold or XP.
Additional tips:
- If the kill is straightforward (for example, you don’t need to use Fire Remnant at all, such as when an enemy is low HP under your tower), pre-place a Fire Remnant in mid. After the fight, fly back to midlane to collect wave XP and gold.
- When enemies spot your movement and retreat under tower—or after you’ve killed them once and appear to leave—plant a Fire Remnant near the side-lane. Walk away or TP to sell the disengage. Once they relax and reposition, fly back in and attack from an unexpected angle.
 Farming Efficiently
Once Flame Guard ![]() reaches level 3–4, Ember Spirit gains access to highly efficient farming patterns. At this point, Ember can:
reaches level 3–4, Ember Spirit gains access to highly efficient farming patterns. At this point, Ember can:
- Quickly clear midlane waves
- Farm jungle camps with minimal HP loss
- Chain lane and jungle together if with vision
When gank opportunities are low, don’t force fights. Instead, convert Flame Guard uptime into consistent gold and XP.
Core Pattern: Lane → Jungle
- Pre-place a Fire Remnant in a nearby jungle camp.
- Clear the midlane wave with Flame Guard .
- While Flame Guard is still active, fly back to the jungle and clear the camp.
Reverse Pattern: Jungle → Lane (This variation is especially useful when the mid wave has not yet reached your tower)
- Place a Fire Remnant toward mid.
- Clear a jungle camp with Flame Guard .
- Fly back to midlane and secure the wave before it’s lost.
Key takeaway for the laning phase:
Prioritize hero levels, control power runes, and play around tempo and resets.
 Mid Game (12-35 min | Hero Level 10 - 20): From Frontline General to Tactical Leader
In the early game, Ember Spirit thrives as a fearless frontline general—trading aggressively, absorbing pressure, and forcing kills with raw spell damage. As the game moves into the mid game, that role must evolve.
You still deal significant damage, but you can no longer absorb everything the enemy throws at you. Opponents now have more spells, higher burst, and multiple ways to quickly break Flame Guard, which only absorbs a fixed amount of damage. Walking directly into the enemy team and tanking spells is no longer viable.
Instead, Ember becomes a tactical leader. Fight alongside your teammates rather than ahead of them. Let others absorb the initial wave of damage and spells, then enter the fight at the right moment—when cooldowns are committed and targets are exposed. Your goal is often not to start fights, but to control and finish them.
Survivability becomes just as important as damage. The longer Ember stays alive in a fight, the more value he provides through repeated spell usage, mobility, and pressure. Dying early removes all of that potential.
Fight with your team—and lead them to victory through timing and positioning.
If you want to dismantle teamfights like the one shown above, understand this: a strong mid game on Ember Spirit isn’t about charging in—it’s about discipline. That means fighting with teammates, watching before committing, always having an escape plan, prioritizing survival to maximize damage, and splitting the battlefield for better team fights. The following sections break down these mid-game fundamentals in detail.
 Fight with Your Team Using Smoke of Deceit
If you’ve already built an advantage in XP and gold from the early game, it’s time to take control of the map. Call your teammates and look to fight together using Smoke of Deceit ![]() .
.
A well-executed smoke lets your team appear from unexpected angles, forcing the enemy into unprepared fights. This naturally spreads enemy attention and damage across your team, creating a safer environment for Ember Spirit to output damage and control the fight.
Remember: you are still one of the strongest heroes on the map. Lead the smoke, fight alongside your teammates, and turn your early advantage into decisive mid-game victories.
 Dodge Key Spells — or Engage After They’re Used
In the mid game, Ember Spirit can no longer absorb all incoming damage. As a result, you should generally wait to engage until the enemy’s key spells are committed. Fighting into a full set of enemy cooldowns will almost always get you killed.
That said, with precise timing, Ember can survive and fight through heavy pressure, even in disadvantageous matchups, by correctly using Sleight of Fist ![]() and Fire Remnant
and Fire Remnant ![]() .
.
- Sleight of Fist
briefly dodges AoE damage, but does not change your position —you return to where the spell was cast.
- A prepared enemy will aim spells at your landing position and punish you the moment Sleight ends.
- Fire Remnant
is what saves you. During Activate Fire Remnant
you are invulnerable and reposition, making it the key tool for surviving mid-game fights.
- When flying, move back and forth between the enemy and your team. This makes it difficult for enemies to target you, naturally shifts damage onto your teammates, and creates safe windows for re-engagement.
- This also means: if you don’t have enough Remnants available, don’t fight aggressively. No remnants = no safety.
When the enemy team still has all their spells available, Ember can be instantly punished if he wants to fight alone — even if a target looks killable. Mid-game discipline means resisting these temptations.
 Split the Battlefield: Kill Supports or Distract the Carry
The flexibility of Fire Remnant ![]() —especially when paired with Aghanim’s Scepter
—especially when paired with Aghanim’s Scepter ![]() , which grants longer range and faster travel—allows Ember Spirit to break large teamfights into smaller, favorable engagements.
, which grants longer range and faster travel—allows Ember Spirit to break large teamfights into smaller, favorable engagements.
1️⃣ Pick Off the Backline
By remnant-jumping into the enemy backline, Ember can quickly eliminate fragile supports. This splits the enemy formation, leaving frontline heroes isolated and vulnerable to your teammates. This is especially powerful during high-ground defenses. When enemy cores dive deep under towers, Ember can wipe out their supports behind them—turning even strong diving heroes into helpless targets.
2️⃣ Become a Distraction
At times, the correct play isn’t to kill—but to distract. Ember can fly directly at enemy cores (mid or carry), forcing them to respond. You don’t need to secure a kill; simply wasting their time while safely escaping is enough by using Fire Remnant ![]() .
.
Every second spent chasing Ember is a second your team uses to win the fight elsewhere.
Both approaches frustrate opponents—“Why can’t we fight together?”—but that confusion is exactly the point. Ember wins by splitting attention, isolating targets, and controlling the battlefield, not by fighting everyone at once.
 Survivability
For Ember Spirit, survivability directly translates into XP, gold, and impact. Ember typically doesn’t build heavy farming items like Battle Fury
![]() , nor does he always have the space to free-farm. Every death significantly delays item progression and sharply reduces Ember’s influence in the mid and late game.
, nor does he always have the space to free-farm. Every death significantly delays item progression and sharply reduces Ember’s influence in the mid and late game.
The good news is that Ember has exceptional tools to stay alive— if Fire Remnant is used with discipline.
1️⃣ Always Place a Fire Remnant Somewhere Safe
Keeping a Fire Remnant ![]() in a safe location dramatically expands the parts of the map Ember can play. With an escape ready, Ember can push dangerous lanes and collect farm that most heroes cannot safely access.
in a safe location dramatically expands the parts of the map Ember can play. With an escape ready, Ember can push dangerous lanes and collect farm that most heroes cannot safely access.
When enemies initiate on you, even a brief window without being stunned is enough:
- Use Sleight of Fist
to instantly dodge and buy time.
- Before landing, activate Fire Remnant to escape to safety.
The same principle applies in teamfights. If some enemy heroes with dangerous spells are missing from vision, never commit without an escape. Always pre-place a Remnant nearby so you can disengage instantly if the fight turns.
2️⃣ Treat Your Last Remnant as “All-In”
If you use all your Remnants while still surrounded by enemies with stuns and spells, you are almost certainly dead. Your final Remnant is your lifeline—do not spend it casually.
With Aghanim’s Shard ![]() , Ember gains a powerful safety trick: killing an enemy hero grants an additional Remnant charge. This allows a disciplined play pattern:
, Ember gains a powerful safety trick: killing an enemy hero grants an additional Remnant charge. This allows a disciplined play pattern:
- Save your last Remnant.
- Use it only to finish an extremely low-HP target.
- Immediately use the refreshed Remnant to escape. This turns a risky kill into a safe disengage.
 Survivability = Damage
Ember Spirit has short cooldowns and thrives on repetition. Staying alive is not passive—it is offensive. Every extra second you survive means more Sleights, more Chains, more Remnant pressure.
Your persistence is damage. And that persistence is often what wins fights.
Key takeaway for the mid game
 Late Game (>35 min | Hero Level >20): Strategic Operator
In the late game, Ember Spirit’s direct threat to enemy cores naturally declines. With full items and levels online, opponents gain powerful tools to blunt Ember’s damage: Black King Bar ![]() and Pipe of Insight
and Pipe of Insight ![]() mitigate large amounts of magical damage, while Manta Style
mitigate large amounts of magical damage, while Manta Style ![]() and Lotus Orb
and Lotus Orb ![]() dispel Searing Chains
dispel Searing Chains ![]() , making it much harder for Ember to reliably land full Remnant damage.
, making it much harder for Ember to reliably land full Remnant damage.
At the same time, survivability becomes more challenging. Enemy cores now deal enough damage to kill Ember quickly, and late-game disables such as Scythe of Vyse ![]() and Abyssal Blade
and Abyssal Blade ![]() can lock Ember down before he has a chance to disengage.
can lock Ember down before he has a chance to disengage.
Does this mean Ember becomes useless in the late game? Absolutely not—if you understand his evolved role.
In the late game, Ember transitions once more: from frontline general, to mid-game leader, to a Strategic Operator whose value is measured by the success of the entire team. While solo kills and raw tankiness are no longer realistic goals, Ember excels at making fights easier for teammates—by controlling vision, splitting the map, forcing reactions, managing lanes, and repeatedly entering and exiting fights with perfect timing.
With survivability prioritized and discipline maintained, Ember’s persistent presence creates constant pressure. He enables teammates to play at their best, stretches enemy attention thin, and turns chaotic late-game fights into winnable scenarios. Alone, Ember may not dominate—but together with the team, his impact is decisive.
To contribute to late-game victories like the one shown above, Ember must build on mid-game fundamentals while mastering a few additional principles: engaging more than once per fight, respecting vision control, abusing extreme mobility to manipulate the map, and understanding the strategic power of lane pressure. These concepts define strong late-game Ember play—and the sections below break them down in detail.
 Engage More Than Once
When the enemy has their full defensive toolkit online—such as Black King Bar ![]() and Pipe of Insight
and Pipe of Insight ![]() —Ember Spirit’s primarily magical damage is heavily mitigated.
—Ember Spirit’s primarily magical damage is heavily mitigated.
Because of this, do not fully commit all your resources at the start of the fight. Avoid spending every Remnant or item immediately. In the first round of a late-game fight, your objective is not to kill heroes—it’s often unrealistic while enemy dispels and defensive items are available.
Instead, focus on survival and trading:
- Absorb and dodge damage without dying
- Force key items like BKB
 , Pipe
  , and Manta Style
- Identify enemy positioning and cooldown usage
- Maintain the mindset that fights are won over multiple rounds
Once those key items are committed, the fight enters its second round—this is where Ember shines. With BKBs and dispels on cooldown, Searing Chains ![]() and sustained magical damage become lethal, allowing Ember and his team to decisively clean up the fight.
and sustained magical damage become lethal, allowing Ember and his team to decisively clean up the fight.
A critical signal to disengage is mana. When Ember runs low, his damage and survivability drop sharply. If the fight is still ongoing, leave a Remnant on the battlefield, walk or TP back to base, reset, and return at full strength to finish the fight. Always remember: Ember’s power comes from his spells. No mana means no spells means no fight.
Never overestimate Ember’s power when enemies have all their items and spells available. But never underestimate Ember’s impact once those key cooldowns are gone.
 Create Vision for Your Team — or Force the Enemy to Reveal Themselves
Vision is often the deciding factor in late-game teamfights. At this stage, Ember Spirit should take on the role of a mobile vision provider—not by placing wards, but by actively revealing enemy positions through movement and pressure.
By stepping forward and playing close to enemy heroes—even briefly drawing their attention—Ember Spirit can reveal crucial information for the team. With items like Shiva’s Guard ![]() , Ember can activate Arctic Blast to gain high-ground vision, exposing enemy positions even when they are hidden in the jungle.
, Ember can activate Arctic Blast to gain high-ground vision, exposing enemy positions even when they are hidden in the jungle.
This often forces reactions. Enemies may respond by casting spells or attacking Ember—instantly revealing their positions. If they instead disengage using tools like Glimmer Cape ![]() , Ember still gains valuable information by tracking the direction and timing of their retreat, allowing the team to prepare for the next engagement.
, Ember still gains valuable information by tracking the direction and timing of their retreat, allowing the team to prepare for the next engagement.
In this sense, Ember functions like a moving torchlight—similar to how Night Stalker ![]() provides vision during nighttime—but with far greater mobility and control. Importantly, this role does not require Ember to secure kills himself. You may have already spent Remnants to scout, or the enemy may still have defensive items available.
provides vision during nighttime—but with far greater mobility and control. Importantly, this role does not require Ember to secure kills himself. You may have already spent Remnants to scout, or the enemy may still have defensive items available.
That’s fine.
By revealing enemy positioning, Ember enables teammates to choose better angles, safer positioning, and more decisive engagement timing. Even without dealing damage, providing vision makes the entire team stronger—and often turns fights in your favor.
 Use Extreme Mobility to Control the Map
Once Ember Spirit acquires Aghanim’s Scepter ![]() , his mobility reaches an entirely new level—and that mobility can be directly converted into map control, especially when Ember is ahead in gold and XP.
, his mobility reaches an entirely new level—and that mobility can be directly converted into map control, especially when Ember is ahead in gold and XP.
With long-distance Fire Remnant mobility ![]() , Ember can instantly join skirmishes that are far too distant for most heroes to reach in time. When teammates take small fights across the map, Ember’s ability to appear immediately often turns those engagements in the team’s favor.
, Ember can instantly join skirmishes that are far too distant for most heroes to reach in time. When teammates take small fights across the map, Ember’s ability to appear immediately often turns those engagements in the team’s favor.
This constant presence effectively allows the team to contest more areas of the map at once, translating into additional gold, XP, and momentum. As these small fights are won, enemy movement becomes increasingly restricted, while Ember’s teammates grow stronger and more confident.
Over time, this compression of enemy space—combined with a farmed and coordinated team—dramatically increases the likelihood of closing out the game.
 Apply or Relieve Lane Pressure
Fire Remnant ![]() allows Ember Spirit to effectively exist in two places at once. While Ember is physically present in one area, he can instantly return to a second location by activating a pre-placed Remnant. This unique property makes Ember exceptionally strong at both applying lane pressure and relieving it.
allows Ember Spirit to effectively exist in two places at once. While Ember is physically present in one area, he can instantly return to a second location by activating a pre-placed Remnant. This unique property makes Ember exceptionally strong at both applying lane pressure and relieving it.
1️⃣ Apply Lane Pressure
By pushing lanes deep, Ember forces the enemy team to respond. When enemies TP to defend, Ember can safely disengage to a pre-placed Remnant.
The real value comes from what happens next. Once enemies commit TPs, they are temporarily removed from the map. Ember and his teammates can immediately pressure the opposite side, creating a numbers advantage. Even if a straight 5-on-5 fight is unfavorable, turning it into a 5-on-3 or 5-on-4 often makes the fight winnable.
This “bait TPs, then strike elsewhere” pattern is especially powerful when your team is behind and cannot win a full engagement head-on.
2️⃣ Mitigate Lane Pressure
The reverse scenario is just as important. While Ember’s team is grouped to attack—pushing Tier-2 towers or high ground—the enemy may attempt to apply pressure on a different lane to slow the push.
If multiple teammates TP back to defend, they may be unable to rejoin the fight in time. Ember solves this problem cleanly. He can push or clear the threatening lane, then immediately return to the main objective using Fire Remnant—allowing the team to maintain pressure without losing numbers.
 Act as a Disabler and Protector
In the late game, Ember Spirit can also function as a powerful disabler, helping control enemy heroes and protect teammates. This role comes from two key mechanics:
- Long-range rooting with Searing Chains
With the Chain Gang Facet, Ember can apply Searing Chains around Fire Remnants . Combined with Aghanim’s Scepter
 , this allows Ember to root enemies from long range—especially effective when opponents try to chase or initiate onto your teammates.
 - Preventing Blink-based initiations
With Aghanim’s Shard
 , Fire Remnant deals magical damage to nearby enemies. Ember can use this to continuously break Blink Dagger
  , shutting down initiators that rely on Blink—such as Axe
  and Magnus
  .
By placing Remnants along common approach paths, Ember can deny clean initiations before they even begin.
.
By placing Remnants along common approach paths, Ember can deny clean initiations before they even begin.
 Prioritize the Enemy Backline
In the late game, Ember Spirit’s damage becomes less reliable against fully itemized cores that can dispel or dodge his spells when the items are ready. However, Ember remains highly lethal to enemy supports, who typically have fewer defensive items and lower survivability.
Look for opportunities to pick off the backline whenever possible. Eliminating supports creates immediate value: it protects your team during key objectives such as high-ground pushes or core-focused fights, and it disrupts the enemy’s overall tempo. Supports are often responsible for vision control, warding, and smoking—removing one or two of them can significantly delay coordinated enemy movements and map plays. By consistently threatening enemy supports, Ember forces the opposing team to play cautiously and gives your teammates more space and preparation time for the next engagement.
Key takeaway for the late game
 Ability and Item Builds
Ability and item builds are critical to maximizing Ember Spirit’s impact throughout the game. In general, Ember’s itemization focuses on three core attributes:
- Tankiness – Allows Ember to absorb damage and tolerate small mistakes. As long as Ember survives until stuns expire, he can escape with Sleight of Fist and Fire Remnant. Higher HP makes it much harder for enemies to burst him down at the start of fights.
- Mana – Ember has four low-cooldown active abilities that consume large amounts of mana. As an Agility hero, he has poor base mana and growth, making mana sustain essential.
- Damage – Ability damage alone does not scale well into the mid and late game. Ember relies on items to amplify and extend his damage output as the game progresses.
With these principles in mind, this section first introduces three common item paths, followed by ability and talent builds.
 Most Common Item Builds
The following builds strike a balance between survivability, mana sustain, and damage across all stages of the game. The full item build sequence is shown below (scroll to view the entire chart).
Fire
Wand
Stone
Boots
Vessel
Boots
Slayer
Threads
Guard
Rapier
Travel
Early Game (Mostly Fixed)
Ember’s early-game items are largely standardized:
- Bottle
 , Magic Wand
  , and Boots
- These provide rune control and—most importantly—mana regeneration, enabling Ember to cast spells frequently and maintain early-game pressure.
Neutral items should generally reinforce these same attributes: survivability, mana, or damage.
Early–Mid Game Item Sets (Choose One)
After the basic setup, Ember should commit to one of the following early–mid game item paths, depending on the enemy draft:
- Phase Boots + Spirit Vessel
 Best against heroes with strong HP regeneration or high durability (e.g., Necrophos
  , Dragon Knight
  , Centaur
  ). Vessel provides damage, HP, mana, and much-needed mana regeneration—making it applicable in most games.
 - Phase Boots + Mage Slayer
 Effective against high magical damage, low-HP heroes (e.g., Storm Spirit
  , Crystal Maiden
  ). Reducing enemy spell damage improves Ember’s survivability in fights.
 - Power Treads
 + Blade Mail
  Strong against heavy physical damage cores (e.g., Sniper
  , Windranger
  , Riki
  , Phantom Assassin
  ) or nukes (e.g., Leshrac). Blade Mail provides armor early, allowing Ember to frontline more safely with Flame Guard.
In most games, Spirit Vessel
Phase Boots vs Power Treads
Early Ember thrives on aggression, which favors Phase Boots:
- Extra armor reduces physical damage from heroes and towers.
- Bonus attack damage converts efficiently into real damage through Sleight of Fist .
However, if Ember already has armor from another item (e.g., Blade Mail ![]() ), the armor from Phase Boots has diminishing returns. In these cases, Power Treads
), the armor from Phase Boots has diminishing returns. In these cases, Power Treads ![]() become superior—offering more HP, mana, and farming speed.
become superior—offering more HP, mana, and farming speed.
Mid Game Core Items
The mid-game core revolves around:
- Aghanim’s Shard
- Aghanim’s Scepter
If you have the gold, buy Shard ![]() immediately once it becomes available. It dramatically boosts both farming and fighting:
immediately once it becomes available. It dramatically boosts both farming and fighting:
- Ember’s innate damage now applies around himself and his Fire Remnants, enabling efficient jungle farming—even when Ember is elsewhere.
- Killing heroes restores a Fire Remnant, increasing both damage and survivability.
- Fire Remnants can continuously break Blink Daggers , disrupting enemy initiations.
Aghanim’s Scepter ![]() provides everything Ember wants:
provides everything Ember wants:
- HP, mana, and damage
- Additional Fire Remnants for nuking
- Long-distance initiation, escape, and map rotation
Why Not Kaya & Sange  ?
?
In my opinion, Kaya and Sange ![]() is inferior to Scepter
is inferior to Scepter ![]() :
:
- Similar HP and mana, but less damage and mobility
- No armor or dispel
Slows down essential follow-up items like BKB and Shiva’s Guard.
If choosing between the two, build Scepter.
Late Game Core and Defensive Items
Core Late Game Item: Shiva’s Guard ![]()
Almost universally strong:
- High armor against physical damage
- HP and mana
- Reduces enemy magic resistance (boosting Ember’s nukes)
- Provides high-ground vision—crucial in late-game fights
Defensive Options (Situational) To against heavy disables (e.g., Hex, Bloodthorn), Ember may need one defensive item:
- Black King Bar
- Linken’s Sphere

- Manta Style
This slot is optional—skip it if unnecessary.
Late Game Damage Scaling
To scale damage further:
- Radiance
 – Strong AoE magical damage and miss chance; synergizes well with Sleight of Fist.
 - Mjollnir
 – Excellent against illusions and in frontline-heavy fights where Static Charge procs frequently.
 - Daedalus
 / Monkey King Bar
  – Reliable physical damage scaling.
 - Divine Rapier – High-risk, high-reward option; turns Sleight of Fist into a support-deleting weapon.
In some games, Ember should prioritize utility over damage:
- Scythe of Vyse
 or Nullifier
  can be game-winning when the team needs control rather than raw DPS.
Final Pieces
- Boots of Travel
 – Essential for managing lane pressure, especially after losing objectives.
 - Refresher Orb
 – A true late-game finisher. With double BKB and up to 10 Remnants, Ember can absorb massive pressure while dealing overwhelming damage.
 Item Builds Under Heavy Pressure
When facing heavy pressure—such as enemy drafts with multiple stuns, silences, or strong catch—Ember Spirit must adapt his itemization to preserve momentum and survivability. This is especially important when Ember is expected to stand forward in mid-game fights to absorb spells and create space for the team.
In these scenarios, the early–mid game items remain the same as the standard builds, since Ember still needs early impact. However, the next major item should prioritize survivability. The item sequence is shown as below (scroll):
Boots
Vessel
Boots
Slayer
Threads
Guard
Guard
Defensive Item Choices:
-
Black King Bar
Best against lineups with multiple stuns or chain disables (e.g., Earthshaker, Lion, Chaos Knight). BKB allows Ember to continue fighting and repositioning without being instantly locked down. -
Linken’s Sphere
Effective against single-target, high-impact control spells such as Legion Commander’s Duel or similar point-click disables. -
Manta Style
or Eul’s Scepter  Ideal against heavy silence or debuff-based lineups (e.g., Skywrath Mage, Silencer, Orchid carriers, Disruptor, or heroes like Kunkka and Slardar).
In most cases, Manta Style is preferred over Eul’s:
- Provides HP, mana, and damage
- Scales better into the late game
However, Eul’s Scepter has unique value:
- Cheaper and faster to build
- Grants brief invulnerability
- Especially useful against specific heroes such as Puck or Kunkka
Choose based on enemy composition, available gold, and your role in upcoming fights.
The following items largely follow the same mid-to-late game progression outlined earlier.
 Late-Game Damage–Focused Item Builds
If you want to take on a larger share of the team’s damage output, this build path, shown as follows, prioritizes maximum late-game damage, trading some mobility and mana efficiency for raw impact.
Boots
Vessel
Boots
Slayer
Threads
Guard
Rapier
The early–mid game items remain the same as the standard builds. Ember still needs an inexpensive early item to secure lane influence, win early skirmishes, and create enough space to farm his first major damage item—Radiance ![]() .
.
Radiance should be built as your second major item, not rushed first. Your initial item should enhance Ember’s spell-based strengths—tankiness, mana, and early pressure—so you can build a resource advantage and farm Radiance faster and more safely. Rushing Radiance too early sacrifices survivability and spell impact, and slows your timing due to Ember’s weaker early farming speed.
A major power spike comes from completing a defensive item—such as Black King Bar ![]() or Linken’s Sphere
or Linken’s Sphere ![]() —shortly after finishing Radiance. While Radiance provides ample mid-game damage, it does little for survivability. Adding a defensive item allows Ember to engage more confidently and deliver sustained AoE damage with Radiance and his spells.
—shortly after finishing Radiance. While Radiance provides ample mid-game damage, it does little for survivability. Adding a defensive item allows Ember to engage more confidently and deliver sustained AoE damage with Radiance and his spells.
These defensive items can be skipped if your teammates are able to create a consistently safe environment for you to deal damage.
From there, Ember can transition into additional damage items to further amplify his teamfight impact. For physical damage scaling, Daedalus ![]() or Monkey King Bar
or Monkey King Bar ![]() are strong choices. To enhance magical and mixed damage output, Mjollnir
are strong choices. To enhance magical and mixed damage output, Mjollnir ![]() is an effective option.
is an effective option.
Key takeaway
 Ability and Talent Builds
With the basics covered here, Ember Spirit has two commonly used ability builds, each emphasizing a different damage profile and playstyle:
- A magical-damage build centered around high-level Searing Chains
- A physical-damage build focused on maximizing Sleight of Fist
Each build excels in different matchups and synergizes with different item paths.
Magical Damage Ability Build (Chains-Focused)
The core idea of this build is to prioritize Searing Chains early, supported by Flame Guard. This setup emphasizes control and survivability. The ability build sequence is shown as follows:
| 1 | 2 | 3 | 4 | 5 | 6 | 7 | 8 | 9 | 10 | 11 | 12 | 13 | 14 | 18 |
|---|---|---|---|---|---|---|---|---|---|---|---|---|---|---|
Strengths
- Strong gank potential: early maxed Chains provide up to 3 seconds of root, making side-lane rotations highly effective.
- Improved survivability: Flame Guard absorbs magic damage and allows Ember to frontline more confidently in early fights.
Trade-offs
- Lower lane aggression against ranged or mobile midlaners, where landing Chains is difficult.
- Heavy Flame Guard usage often pushes lanes, allowing opposing midlaners to farm more freely.
This build pairs best with tank-oriented item sets:
-
Phase Boots
+ Spirit Vessel -
Power Treads
+ Blade Mail
Both item paths enhance Ember’s durability, allowing him to fully leverage Flame Guard’s damage during engagements.
Physical Damage Ability Build (Sleight-Focused)
This build shifts priority away from Searing Chains and instead maxes Sleight of Fist early, emphasizing sustained harassment and debuff application.
| 1 | 2 | 3 | 4 | 5 | 6 | 7 | 8 | 9 | 10 | 11 | 12 | 13 | 14 | 18 |
|---|---|---|---|---|---|---|---|---|---|---|---|---|---|---|
Strengths
- Strong lane pressure: frequent Sleight usage steadily chips down enemy HP, forcing consumables or trips back to base.
- Excellent against low-armor, spell-reliant heroes (e.g., Puck), where Sleight damage adds up quickly.
- Consistent debuff application across multiple targets.
Trade-offs
- Limited control: rotations rely more heavily on teammates to provide stuns or roots.
- Lower early tankiness due to a reduced Flame Guard level, requiring careful positioning.
Because of these trade-offs, Ember should poke repeatedly with Sleight of Fist before committing with Fire Remnant.
This build works best with:
*Phase Boots ![]() + Mage Slayer
+ Mage Slayer ![]()
Phase Boots amplify Sleight’s physical damage, while Sleight’s AoE application spreads Mage Slayer’s spell damage reduction to multiple enemies—greatly reducing their impact in fights.
Talent Builds
Ember Spirit’s talent choices should always be adapted to the enemy draft, as well as your ability build and item progression. There is no single “correct” talent tree—each tier rewards different game states and playstyles.
Level 10: “+165 Flame Guard Barrier Amount” vs “+12 Damage”
The default choice is “+165 Flame Guard Barrier Amount”, which significantly improves Ember’s early survivability and tolerance for mistakes.
Consider “+12 Damage” only if:
- The enemy can consistently dispel Flame Guard, or
- You are running a Sleight of Fist–focused build, where the bonus damage meaningfully increases your early impact.
Level 15: “+0.8s Searing Chains Duration” vs “+100% Flame Guard DPS”
In most games, “+100% Flame Guard DPS” is the stronger option—when farming and Ember can enter fights with BKB, dealing massive AoE damage while standing in the middle of engagements.
Choose “+0.8s Searing Chains Duration” if:
- You cannot safely approach enemies due to heavy burst or long-range nukes,
- Flame Guard is easily dispelled, or
- Your team lacks reliable control and desperately needs the extra root duration.
Level 20: “+50 Sleight of Fist Damage” vs “+50 Searing Chains Damage”
The standard choice is “+50 Sleight of Fist Damage”. In the mid to late game, Chains damage is often unreliable due to dispels, while Sleight damage consistently converts into real impact.
However, if the enemy has very limited dispels, combining “+50 Searing Chains Damage” with the level 15 “+0.8s Chains Duration” can also be very strong.
Level 25: “-12s Remnant Charge Restore Time” vs “2 Sleight of Fist Charges”
My personal preference is “−12s Fire Remnant Charge Restore Time”. This allows Ember to consistently have up to five Remnants per fight, greatly enhancing damage, survivability, and re-engagement potential in late-game teamfights.
Choose “2 Sleight of Fist Charges” if:
- Your item build heavily favors physical damage, or
- You have Refresher Orb, which can compensate for Remnant availability.
Key takeaway
 Advantageous and Difficult Matchups
Mid Lane Matchups
As a midlaner, Ember Spirit performs best against heroes with moderate damage output or low armor, where his spells can reliably pressure and trade.
Favorable matchups
- Flame Guard absorbs sustained or moderate damage from heroes such as Void Spirit
 , Earth Spirit
  , Primal Beast
  , and Sand King
  .
. - Ember trades health efficiently against melee midlaners like Kunkka
 and Pangolier
  , where repeated spell usage and positioning favor him.
 - Sleight of Fist applies heavy pressure to low-armor, spell-reliant heroes like Puck
 , Skywrath Mage
  , and Invoker
  .
.
Difficult matchups
Ember struggles against heroes that either:
- Overwhelm Flame Guard with burst magic damage, such as Lina
 , Shadow Fiend
  , and Queen of Pain
  .
. - Out-sustain Ember’s damage through regeneration, making trades ineffective—examples include Dragon Knight , Necrophos , Monkey King
 , and Timbersaw
  .
.
Ember is also weak against strong lane bullies that dominate early levels and deny space, such as Meepo ![]() , Viper
, Viper ![]() , Huskar
, Huskar ![]() , and Lone Druid
, and Lone Druid ![]() .
.
Draft Synergy and Team Composition
Ideal Teammates
Ember performs best in drafts that provide:
- Tanky frontliners who can absorb damage and initiate fights. Examples: Tidehunter
 , Clockwerk
  , Tusk
  , Mars
  .
. - Physical-damage carries who can close out games once Ember creates space. Examples: Drow Ranger
 , Juggernaut
  , Ursa
  , Terrorblade
  .
.
Ember also benefits greatly from specific synergies:
- Pudge
 : Chains into Hook setups
 - Keeper of the Light
 : Mana sustain and cooldown reduction for higher tempo
 - Oracle
 : Rune control and defensive utility
In general, Ember thrives with teammates who have low cooldown abilities and are willing to fight frequently during the mid game.
Matchups Across the Game
Heroes Ember excels against
- High-armor but low-HP carries in the early–mid game (e.g., Terrorblade , Drow Ranger ), where Ember’s magic damage is most effective.
- Illusion-based heroes like Chaos Knight
 and Phantom Lancer
  .
. - Ranged carries such as Windrunner and Muerta, whom Ember can quickly close the gap on.
- Low HP supports such as Ancient Apparition
 and Rubick
  .
.
Heroes Ember struggles against
- Heroes that dodge or mitigate magic damage in the late game, such as Lifestealer
 , Juggernaut , and Anti-Mage
  .
. - Long-duration lockdown like Legion Commander
 ’s Duel and Axe ’s Call, which can kill Ember before he can react.
 - Strong dispel and magic immunity supports, such as Omniknight
 , Abaddon
  , and especially Oracle , who can fully negate Ember’s magical damage.
 - Heavy stun or silence drafts—Ember can tolerate one or two disables, but games become very difficult when enemies have three or more stuns or silences, or long-duration control like Bane.
- High-burst or counter-stun heroes like Earthshaker
 and Nyx Assassin
  , who can punish Ember via Spiked Carapace against Flame Guard or Radiance.
 - AoE or global silences that are hard to dodge, such as Silencer
 ’s and Disruptor
  ’s ultimates.
Key takeaway
 Additional Notes & Context
-
Written for Dota 2 patch 7.40
-
Clips from Divine / Immortal ranked games (some footage may be from 7.38–7.39)
-
I want to express my deepest gratitude to my partner, whose thoughtful reading and constant encouragement made this blog possible.
-
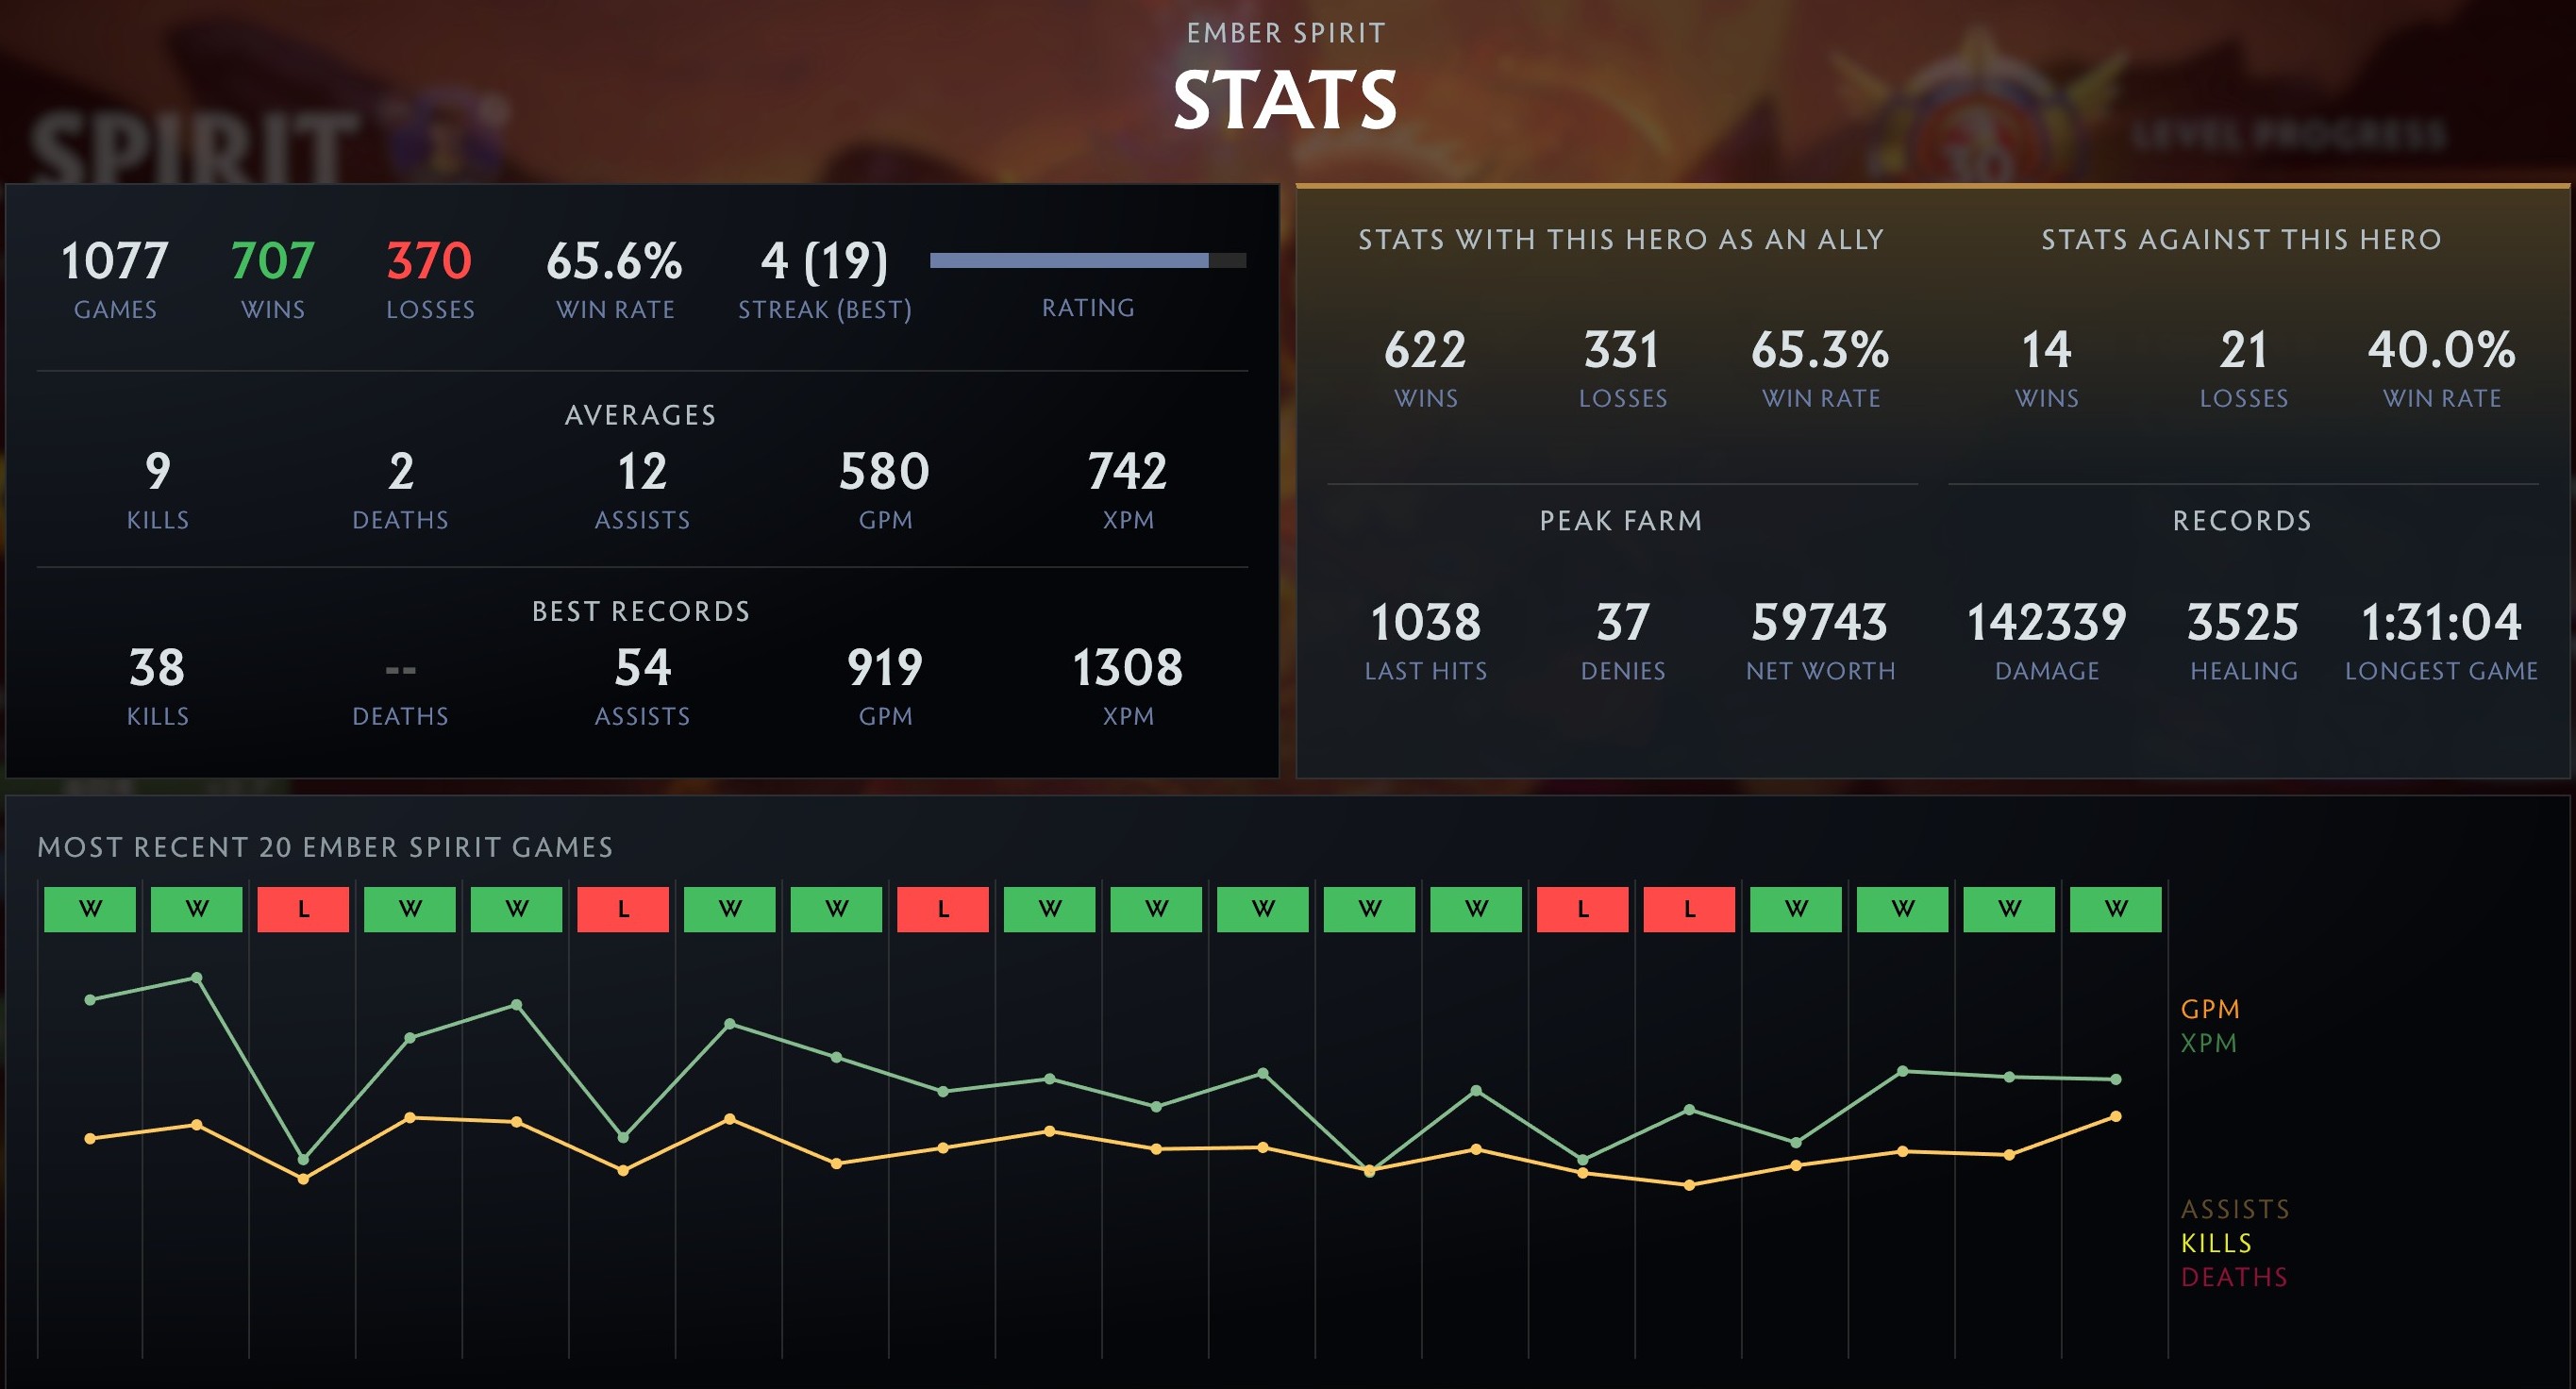
Below are my personal Ember Spirit career stats for reference